| In this story 🧭 | Quick wins ⚡ |
|---|---|
| Golden-and-crispy fundamentals (thin cutlets, layered seasoning, hot oil) | ✅ Pound chicken to 1/4 inch (6 mm) for even cooking |
| Breadcrumb strategy (why panko wins, how to blend crumbs) | ✅ Aim for 350°F / 175°C oil for clean crunch |
| Pan-frying design choices (skillet size, batch logic, draining) | ✅ Rest breaded cutlets 5–10 minutes so coating adheres |
| Air fryer and oven paths (what you gain, what you trade) | ✅ Drain on a wire rack, not paper towels, to avoid steaming |
| Plating and sides (lemon, mustard, potatoes, salads) | ✅ Fry 1–2 pieces at a time; crowding kills browning |
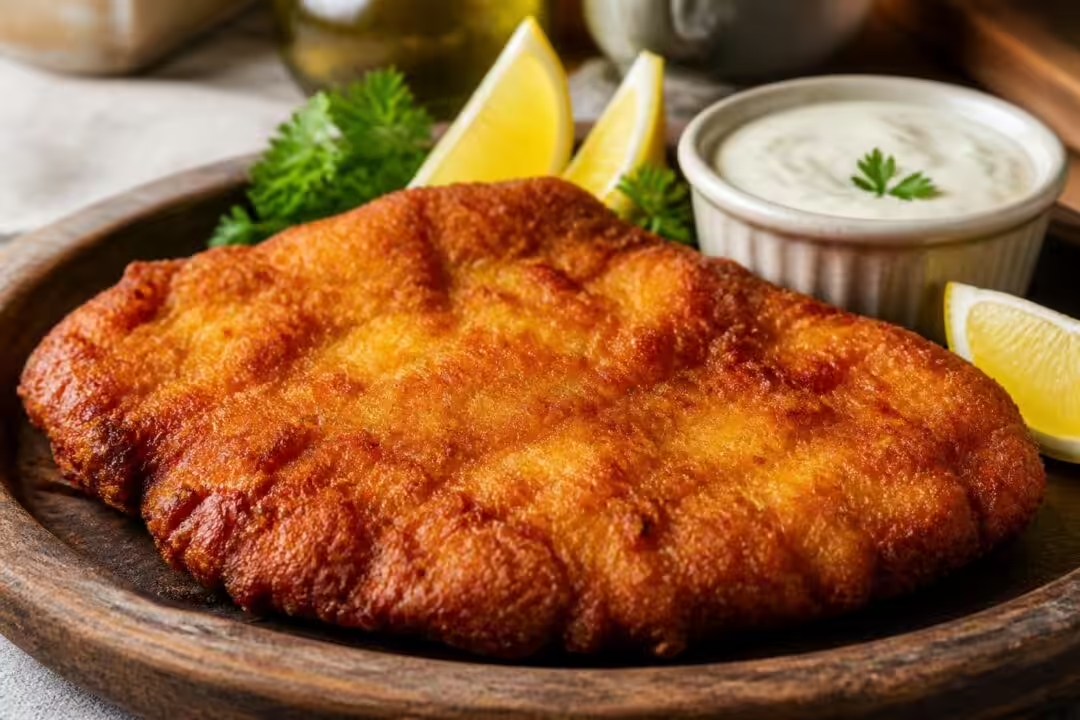
Chicken schnitzel is one of those home-cooking flexes that looks restauranty but behaves like a weeknight staple—if the technique is clean. The goal is specific: a crust that shatters when cut, chicken that stays juicy, and a surface that reads golden rather than “fried.” That outcome isn’t luck; it’s a short chain of decisions. Treat the cutlet like a design object—thickness, coating, heat, and moisture—and the result becomes repeatable.
Chicken Schnitzel Golden-and-Crispy Basics That Actually Work
The fastest way to ruin schnitzel is to think the crust is the main event. It isn’t. The main event is balance: thin meat that cooks quickly, a coating that browns before the chicken dries, and just enough oil contact to set the crust without turning it heavy. Get those three aligned, and “golden and crispy” stops being a vibe and becomes a guarantee.
Start with the cutlet. Large chicken breasts often need to be split horizontally before pounding; otherwise, one end stays thick and the other turns ragged. The target thickness is 1/4 inch (about 6 mm). Thinner than that can tear and cook too fast; thicker takes longer, forcing the breadcrumbs to darken before the center is ready. That 1/4-inch standard is also a timing gift: the cook becomes predictable, usually 2–3 minutes per side in properly heated oil.
Why “even thickness” is the real tenderness trick
People often blame dryness on “overcooking,” but the real culprit is uneven thickness. A thicker center needs more time, and by the time it’s safe, the edges have turned tough. Even thickness solves two problems at once: it shortens total cook time and makes doneness uniform. A simple workflow helps: place chicken between plastic wrap (or in a partially closed zip bag so air can escape), then pound gently with the flat side of a mallet. The goal is controlled compression, not aggression—tearing creates weak spots where the crust slips.
Seasoning in layers is not fussy—it’s structural
Schnitzel tastes flat when seasoning is only applied at the end. Salt and pepper should hit the chicken, then quietly reinforce in the flour, the egg, and the breadcrumbs. Each layer is thin, so each layer needs a little flavor. This is especially important with panko, which is airy and can read bland if it’s not seasoned. A small spoonful of Dijon stirred into the eggs does two jobs: it adds tang and improves adhesion, like culinary primer under paint.
Keep the process tight and calm. Set up three shallow dishes in a straight line: flour, egg, breadcrumbs. Dredge in flour and shake off excess (extra flour turns gummy). Coat in egg thoroughly (dry spots become bald patches). Then press firmly into breadcrumbs—pressing is not optional if you want a crust that holds through flipping. If there’s one “pro move” that feels too simple, it’s the 5–10 minute rest after breading. That short pause hydrates the flour-egg interface so the coating bonds instead of peeling in the pan.
That bonding step sets up the next variable: hot oil. Oil that isn’t hot enough turns the coating into a sponge. Oil that’s too hot browns the crust before the chicken is cooked. The sweet spot is 350°F / 175°C. No thermometer? Drop in a breadcrumb: it should sizzle immediately and float with lively bubbles. That audible feedback is part of the method. Crispness has a sound.
Insight to keep: schnitzel success is a chain—if thickness, adhesion, and heat are aligned, golden crispness is automatic. 🔑
Panko vs. Breadcrumbs: The Coating Choices That Control Crunch
Not all crumbs brown the same way. Schnitzel’s surface is basically an engineered texture: you want many tiny ridges that fry quickly and evenly, creating maximum crispness with minimal oil absorption. That’s why panko—with its larger, jagged flakes—tends to win in home kitchens. It creates more airy pockets, which read as crunch rather than hardness.
Traditional European schnitzel often uses fine breadcrumbs, and that version has its own charm: a tight, delicate crust that almost melts into the meat. But for chicken, especially breast meat, a more protective crust is useful. Chicken dries faster than veal or pork, so the thicker, airier panko armor buys time and tenderness. In repeated testing, panko also delivers a more consistent “golden” rather than “brown,” because it can crisp before it darkens.
A smart blend: half panko, half seasoned crumbs
For readers who want both texture and flavor, a blend is the move: 50% panko + 50% Italian-style breadcrumbs. The seasoned crumbs carry garlic-herb notes and finer particles that fill in gaps, while panko contributes the shatter. It’s a simple way to make the crust taste seasoned without dumping a lot of dried herbs into the bowl (which can burn in hot oil and create bitter flecks).
Pressing technique matters more than people admit
Breadcrumbs aren’t paint; they’re tiles. If they aren’t pressed into place, they fall off under the stress of flipping. After the egg dip, lay the cutlet into crumbs and press with an open palm, then flip and press again. The goal is contact. This is also why shallow plates beat deep bowls: a broad surface makes pressing easier and keeps the workflow clean.
There’s a quiet moisture management trick here, too. If the egg mixture is too thick, it creates a heavy layer that steams under the crust. A small splash of water in the eggs thins it slightly, improving coverage without creating a rubbery layer. Dijon in the egg adds emulsified fat and acidity, which helps the coating grip and brightens the overall flavor profile.
For a more designerly schnitzel—one that looks evenly bronzed—keep the crumb bed “fresh.” As you bread multiple pieces, crumbs clump with egg drips and become dense nuggets that fry darker than the surrounding crust. When that starts happening, shake the plate, break up clumps, or top up with a handful of new crumbs. This tiny refresh is the difference between a uniform golden cutlet and one with random dark patches.
Want a crisp that holds longer on the table? Season the chicken generously, but keep the crumb layer relatively dry. Overloading the crumbs with wet spices or grated cheese can compromise crispness by encouraging clumping. If cheese is the goal, it’s better placed elsewhere—like a parmesan shower on hot fries served alongside—than embedded in the breading.
- 🍞 Best crunch: panko (alone or blended)
- 🌿 Best flavor boost: seasoned breadcrumbs mixed in at 50%
- 🧂 Best tasting habit: season every layer, lightly
- 🖐️ Best adhesion move: press crumbs firmly, then rest 5–10 minutes
- 🎯 Best visual payoff: refresh crumbs to avoid clumps and dark spots
Insight to keep: the crumb you choose sets the texture, but the way you press and manage the crumb bed sets the final look. ✨
Pan-Frying Chicken Schnitzel in a Skillet: Heat, Oil Depth, and Batch Design
Pan-frying is the sweet spot for schnitzel at home: less oil than deep-frying, better crust than baking, and more control than most people expect. The method is shallow frying—about 1/2 inch (1.25 cm) of neutral oil—so the coating gets real contact with hot fat without submerging the chicken. That contact is what sets the crust into a crisp shell instead of a soft jacket.
Oil choice is practical, not trendy. Use a high smoke-point neutral oil like vegetable, canola, or sunflower. Olive oil can smoke before the coating is done, and that scorched flavor reads immediately. A cast-iron skillet shines because it holds heat steady when cold chicken hits the pan, but any heavy-bottomed skillet works if it’s wide enough.
The 350°F / 175°C rule (and why it matters mid-batch)
At 350°F / 175°C, the coating begins crisping almost immediately, which keeps oil absorption low. When oil is cooler, the breadcrumbs drink fat before they can set, creating that heavy, greasy finish people associate with “bad frying.” When oil is hotter, the surface browns too fast and you end up with a cutlet that looks perfect but has a slightly undercooked center—or worse, a dark crust with dry chicken because it stayed in the pan too long.
Mid-batch oil is its own variable. After two or three rounds, stray crumbs can scorch and tint the oil, which then stains later schnitzels a darker color and adds bitterness. It’s not precious to swap the oil; it’s quality control. If the oil starts smelling toasted or looks overly brown, strain it or replace it. That single decision keeps the flavor clean and the color consistent. 🛠️
Don’t crowd the pan: crispness needs space
Crowding drops oil temperature and traps steam. Both are enemies of crunch. In a 10.5-inch skillet, it’s common to fry one large schnitzel at a time. That feels slower, but it’s faster than trying to “save time” and ending up with a pale crust that needs extra minutes. A pale crust doesn’t just look wrong—it has less structure, so it softens faster on the plate.
Timing stays simple when thickness is right: 2–3 minutes per side. Flip once, gently, with a thin spatula or tongs and a supporting hand if needed. Excess flipping sheds crumbs. If the pan seems to cook unevenly, rotate the cutlet rather than flipping repeatedly.
Wire rack draining is non-negotiable
A schnitzel drained on paper towels steams on the underside. Steam turns crispness into softness in under a minute, especially with a thicker panko crust. A wire rack over a sheet pan solves this by letting air circulate. It also keeps the crust intact and lets residual oil drip away instead of soaking back in.
Here’s a workflow that reads like a calm kitchen: bread cutlets, rest them, heat oil, fry in small batches, rack-drain, season with a tiny pinch of salt while hot, then hold in a warm oven if needed (around 200°F / 95°C) while finishing the batch. The result: every piece lands at the table crisp.
| Decision point 🧩 | Do this ✅ | Avoid this 🚫 |
|---|---|---|
| Oil depth | ~1/2 inch (1.25 cm) for shallow fry | Too little oil (patchy browning) or deep-fry guessing |
| Oil temperature | 350°F / 175°C (breadcrumb sizzles fast) | Cool oil (greasy crust) or overheated oil (scorched crumbs) |
| Batch size | 1–2 cutlets max, depending on skillet | Crowding (steam + temperature crash) |
| Draining | Wire rack over sheet pan | Paper towels (steamed underside) |
| Oil maintenance | Swap/strain after 2–3 batches if dark | Reusing burnt-crumb oil (bitter flavor, muddy color) |
Insight to keep: the skillet method isn’t about frying more—it’s about controlling heat and airflow so the crust stays crisp from pan to plate. 🔥
Air Fryer and Oven Chicken Schnitzel: Crisp Without the Mess (With Honest Tradeoffs)
Sometimes the goal isn’t “best possible crust.” It’s “great schnitzel with less cleanup.” That’s where air frying and baking earn a spot. They won’t replicate shallow-fried texture perfectly—oil contact is part of the original architecture—but they can produce a genuinely crisp cutlet if the breading is built well and the surface gets a light coating of oil.
The key is to stop treating these as shortcuts. The prep remains the same: pound to 1/4 inch, season in layers, flour-egg-crumb, then rest. That rest time still matters because airflow (especially in an air fryer) can lift loose crumbs and create bald spots.
Air fryer method: the closest thing to fried
Air fryers became standard countertop equipment in American kitchens by the mid-2020s, and by now the best models move air aggressively and predictably. That high convection is why schnitzel can crisp without a pan of oil. The most reliable setup is: preheat to 400°F / 200°C, arrange cutlets in a single layer, mist lightly with oil, then cook 8–10 minutes, flipping halfway.
What changes compared to pan-frying? Color develops slightly differently: you’ll get a more even, matte gold rather than the deeper shimmer of oil-fried crumbs. Texture is crisp, but less “shattery.” That’s not a failure; it’s physics. Still, for weeknights, it’s a win—especially if multiple cutlets can cook at once in a larger basket-style fryer.
Oven method: best for feeding a crowd
Baking is about capacity. On a wire rack set over a sheet pan, hot air can circulate and crisp the underside. The reliable temperature is 425°F / 220°C for 15–18 minutes, depending on cutlet size. The rack is essential; baking directly on a pan traps moisture and softens the crust.
A light oil spray is not optional here. Without it, breadcrumbs toast rather than fry, which can feel dry. With it, the surface browns more evenly and the crust gets closer to that classic schnitzel crunch. If the oven has convection, use it—convection is the oven’s version of an air fryer.
A practical “hybrid” for peak texture
For cooks who want the best of both worlds—especially when making several batches—there’s a hybrid approach: pan-fry the first side to set the crust, flip once, then move the skillet to a hot oven to finish. It’s not traditional, but it’s effective when the stovetop feels crowded. The crust sets in oil, then the oven finishes cooking gently, reducing the risk of over-browning the second side.
However it’s cooked, the finishing details stay classic: a squeeze of lemon is not decoration; it’s contrast. Acid cuts through richness and makes the crust taste lighter. A small spoonful of Dijon on the plate gives a sharp edge that makes chicken taste more like itself.
Insight to keep: air fryer and oven schnitzel succeed when they’re treated like real techniques—built on proper pounding, resting, and airflow. 🌬️
Serving Chicken Schnitzel: Lemon, Dijon, and Sides That Make It Feel Finished
Schnitzel is a cutlet plus a crust, but the plate is where it becomes a meal. The most satisfying schnitzel dinners have a clear flavor geometry: rich-crisp chicken, bright acid, and something soft or starchy to catch drips. That’s why the classic pairing—lemon, Dijon mustard, and mashed potatoes—keeps showing up. It’s not nostalgia; it’s balance.
Start with the lemon. A wedge served on the side lets each eater control brightness, and squeezing at the table preserves aroma. That citrus lift is especially important if the schnitzel is pan-fried, because the nose picks up warm oil notes. Lemon reframes those notes as “toasty” rather than “fried.” If lemon isn’t available, a few quick pickles or a vinegar-forward salad can play the same role.
Mashed potatoes: the comfort-food anchor
Buttery mashed potatoes do something smart alongside schnitzel: they turn contrast into comfort. The crisp cutlet stays crisp; the potatoes catch any runoff and turn it into sauce without requiring an actual pan sauce. For a more modern plate, mashed potatoes can be replaced with a potato salad dressed in mustard and herbs—still classic, slightly lighter, and visually fresh.
Vegetable sides that respect the crust
The wrong side dish makes schnitzel soggy. Anything steamy piled on top—like hot sautéed greens—softens the coating. Keep wet sides separate, and favor crisp or chilled vegetables. A simple cucumber salad with a little vinegar and dill is a clean counterpoint. Roasted asparagus works if it stays dry and lightly seasoned. Even a shaved fennel salad brings crunch that mirrors the schnitzel without competing.
- 🍋 Acid: lemon wedges, quick pickles, or a vinegar salad
- 🥔 Comfort starch: buttery mashed potatoes or mustardy potato salad
- 🥗 Fresh crunch: cucumber-dill salad, shaved fennel, or a simple slaw
- 🌿 Finishing touch: chopped parsley for color and a clean herbal note
Holding and reheating without wrecking crispness
If schnitzel needs to wait, it should wait with airflow. A wire rack in a low oven keeps the underside from steaming. For leftovers, the microwave is a crispness killer; it turns the crust elastic. The best move is a dry skillet over medium heat until the crust re-crisps, or an oven at 350°F / 175°C for 10–15 minutes. An air fryer at 350°F / 175°C for 3–5 minutes is even faster and usually brings back the crunch.
Storage matters more than people think. Cooked schnitzel should cool fully before it’s sealed; trapping steam in a container softens the coating overnight. In the fridge, it holds well for about 3 days. For longer storage, freezing works both raw (breaded, then frozen in a single layer before bagging) and cooked (with the honest expectation that the crust may soften slightly after thawing).
When the plate comes together—crisp cutlet, bright lemon, sharp mustard, soft potatoes—the whole thing reads intentional. That’s the point: schnitzel isn’t complicated food, but it rewards cooks who care about the details that diners can feel. Insight to keep: the best schnitzel plates are designed for contrast, not clutter. 🎯

Hi, I’m Landon Brooks. I am the editor-in-chief of Cook and Design, but for the first decade of my working life I was actually a product designer in New York.