| Sections 🧭 | What to remember ✅ |
|---|---|
| 1) Chocolate self-saucing pudding, explained | One batter becomes two textures: sponge on top, sauce underneath ✨ |
| 2) Ingredient choices that change the outcome | Brown sugar + cocoa steer moisture, bitterness, and gloss 🍫 |
| 3) The technique that makes the “magic” reliable | Hot liquid poured over a spoon prevents craters and keeps layers intact 🥄 |
| 4) Serving, styling, and plating like a designer | Temperature contrast (hot pudding, cold ice cream) is the whole point ❄️🔥 |
| 5) Variations, troubleshooting, and storage | Don’t overbake or the sauce tightens into fudge 🎯 |
Chocolate self-saucing pudding is a dessert that still feels like a party trick, even for people who bake often. A single dish goes into the oven looking like a plain cocoa batter with a murky, sweet liquid pooled on top—then comes out with a tender chocolate sponge above a glossy, spoonable sauce. It’s comfort food with structure, the kind of recipe that fits an American weeknight but plates like something you’d linger over after a dinner party.
Chocolate Self-Saucing Pudding: How the “Magic Dessert” Works in One Pan
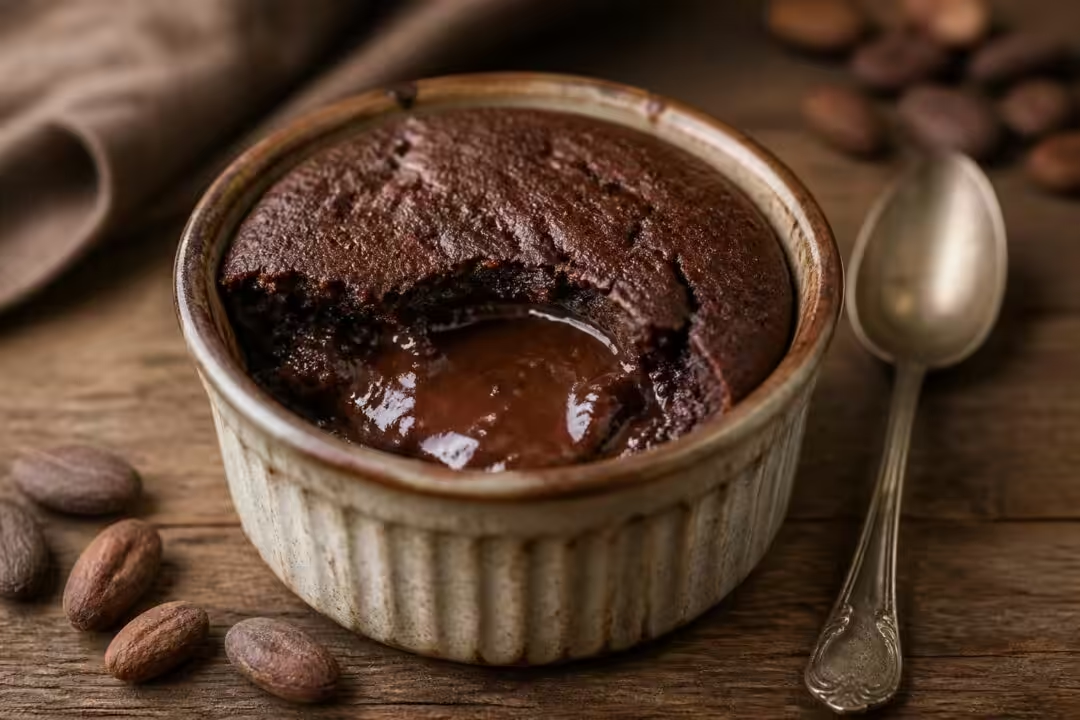
The phrase self-saucing is not marketing; it’s a description of a controlled transformation. The method relies on layering: a cake-style batter sits on the bottom, a dry cocoa-sugar mix gets scattered over the surface, and boiling water (or very hot water) is poured on top. During baking, the batter rises and sets into a sponge while the liquid migrates downward and thickens, becoming a sauce that collects underneath.
That migration is the “magic,” but it’s also physics and starch behavior. Sugar dissolves quickly in hot water, cocoa disperses, and the mixture becomes a thin chocolate syrup. In the oven, the batter’s structure firms up from heat: proteins from the egg coagulate, starches gelatinize, and baking powder releases gas that lifts the sponge. Meanwhile, the sugary liquid concentrates as water evaporates and as starches from the batter’s underside gently thicken it. The result is a top that’s springy and cake-like and a bottom that’s glossy and molten.
To make the idea feel real, it helps to picture a specific scenario. A fictional Cook and Design reader—call her Mina—keeps a minimal pantry: flour, cocoa, brown sugar, butter, eggs, vanilla, milk. She wants something warm at 9:30 p.m. that doesn’t involve frosting, chilling, or a stand mixer. Self-saucing pudding is built for that moment: 10–15 minutes of prep, then the oven does the rest while the kitchen smells like cocoa and caramelized sugar.
One design-forward detail is that the dish itself matters. A deeper 8-inch round pie plate (or small baking dish) encourages a thicker sponge and a generous pool of sauce. A larger dish spreads batter thinner, so the top can set faster and the sauce may reduce more aggressively. Neither is “wrong,” but the dessert’s identity shifts: thick and spoonable versus thinner and more like a lava-cake casserole.
There’s also an emotional reason this dessert stays relevant: it’s interactive. Everyone serves themselves, and the first spoon breaks the surface to reveal the hidden layer. That reveal is part of the pleasure—like cutting into a galette and seeing juices run, or cracking a brûlée. The key insight is simple: this is a two-layer dessert engineered through layering, heat, and timing, not luck.
The next step is making smart ingredient choices, because the same “magic” can taste flat or profound depending on cocoa, sugar, and dairy.
Best Ingredients for Chocolate Self-Saucing Pudding: Cocoa, Brown Sugar, and the Moisture Equation
This dessert is famous for being made from everyday pantry staples, but “basic” doesn’t mean “no decisions.” The ingredient list is short—flour, cocoa powder, baking powder, brown sugar, butter, egg, vanilla, milk, plus a cocoa-sugar-hot-water topping—so each component pulls more weight than it would in a layered cake.
Cocoa powder is the obvious lever. Natural unsweetened cocoa tends to read brighter and slightly sharper; Dutch-processed cocoa is darker and rounder. Either can work in the sauce portion; in the cake portion, natural cocoa pairs comfortably with baking powder and keeps the crumb tasting classic rather than intensely fudgy. If Mina wants a more “black dress” look for a dinner party, Dutch cocoa in the topping can deepen the sauce color without changing the batter too much.
Brown sugar does more than sweeten. The molasses content adds moisture and a gentle caramel note that makes the sauce taste layered instead of one-dimensional. Light brown sugar is clean and familiar; dark brown sugar pushes toward toffee and can make the sponge feel plusher. For a crowd that likes their desserts less sweet, keeping the batter mildly sweet and letting the sauce deliver the punch is the move—because the sauce gets concentrated in the oven anyway.
Fat matters too. Melted unsalted butter gives control: different brands vary in saltiness, and this recipe is sensitive to small shifts. Melted butter also keeps the workflow simple—no creaming stage, no waiting for softened butter—while still delivering tenderness. A pinch of salt is not optional in practice; it sharpens cocoa and keeps the sweetness from feeling blunt. That’s not a “health” claim, just palate mechanics.
Milk is where American kitchens often improvise. Whole milk produces the richest crumb and the smoothest flavor line between sponge and sauce. Reduced-fat milk works, but the top can feel a touch more bready. Oat milk can be excellent here, especially versions labeled “full fat,” because they mimic dairy’s body; soy milk tends to be more neutral than almond in chocolate desserts. The core principle: the batter needs enough richness to stand up to a very intense sauce.
Vanilla extract is another quiet upgrade. Extract (not imitation essence) adds aromatic lift that prevents the pudding from tasting like straight cocoa paste. If a pantry only has imitation vanilla, using slightly less avoids a sharp artificial note.
For clarity and repeatability, here’s a compact checklist that Mina uses on a sticky note inside her pantry door:
- 🍫 Cocoa: natural for classic flavor; Dutch in the topping for darker sauce
- 🟤 Brown sugar: dark for extra moisture and caramel edge; light for cleaner sweetness
- 🥛 Milk: whole milk for best texture; oat milk as a strong dairy-free option
- 🧈 Butter: unsalted + pinch of salt for control
- 🌿 Vanilla extract: real extract keeps chocolate tasting fuller
The insight that makes this section worth saving: because the ingredient list is short, quality and type choices show up loudly in the final spoonful.
Once ingredients are dialed in, the technique becomes the difference between reliable “two layers” and a disappointing, uniform bake.
Chocolate Self-Saucing Pudding Technique: The Spoon-Pour Method, Layering, and Bake Timing
The most important technical moment in chocolate self-saucing pudding is also the easiest to rush: pouring hot liquid over an unbaked batter. Done carelessly, it can punch holes straight through the surface, dragging cocoa into the sponge and leaving the top patchy or dense. Done with intention, it creates a clean separation: sponge above, sauce below.
The practical solution is the spoon-pour method. An upturned spoon held just above the batter disperses the hot mixture in a gentle sheet. The liquid lands softly and spreads across the surface rather than drilling a crater. This is not precious; it’s the difference between “magic” and “mud.”
Workflow matters, too. Start by preheating the oven fully—most home ovens swing and recover slowly after the door opens. If the pudding goes in while the oven is still climbing, the batter can set too slowly, allowing the liquid to mix in rather than separate. In testing, we’ve found that stable heat is what makes the sauce stay saucy.
The batter itself should be mixed with restraint. Melted butter encourages quick overmixing because it feels smooth early. But flour still needs gentle handling: overmixing develops gluten and can turn the top into something chewy instead of plush. The best mental model is muffin batter: mix until just combined, stop while it still looks slightly rough, then spread it into the greased dish.
Bake timing is the next hinge point. In many ovens, 25–30 minutes at around 350°F/180°C (or slightly lower in some recipes, around 335°F/170°C) lands the pudding in the sweet spot. The top should look set and feel springy when pressed lightly. The center should not jiggle like raw batter, but it also shouldn’t feel dry like a finished cake. Pulling it at the right moment preserves the sauce layer.
A short rest—10–15 minutes—finishes the job. Right out of the oven, the sauce is extremely fluid and the sponge is delicate. A brief pause thickens the sauce to a spoon-coating consistency and makes serving clean and dramatic. That rest is also when the kitchen goes quiet and everyone starts hovering.
Tools that keep the pudding low-stress (and why they matter)
The tool list is short, but each item reduces friction. Two bowls allow dry and wet mixing separately, which prevents overworking the batter. A balloon whisk handles dry blending quickly. A heatproof jug makes the boiling-water step safer and more controlled. An electric beater is optional; the batter doesn’t require aerating like a layer cake.
For Mina’s small apartment kitchen, the ideal setup looks like this:
- 🥣 Two mixing bowls (dry + wet keeps mixing gentle)
- 🧁 8-inch pie dish or small baking dish (better sauce depth)
- 🥄 Dessert spoon (for spoon-pour and for serving)
- 🫖 Heatproof jug (controlled pour of boiling water)
The final insight: self-saucing pudding is less about complicated technique and more about one careful pour, one careful pull from the oven.
Once the layers are reliable, serving becomes a design problem: contrast, temperature, and how to make the sauce look intentional rather than messy.
How to Serve Chocolate Self-Saucing Pudding: Temperature Contrast, Plating, and Pairings
Chocolate self-saucing pudding is at its best when it’s warm. Not lukewarm, not piping hot—warm enough that the sauce flows, but settled enough to cling to the spoon. This is the dessert’s core pleasure: a tender top that yields and a sauce that pools like satin around it.
The classic American pairing is vanilla ice cream, and it works for a reason that’s more technical than nostalgic. Cold dairy slows the sauce the moment it touches it, creating streaks and ribbons instead of a uniform brown puddle. That contrast also gives the palate a break from cocoa intensity. For readers who grew up with British-style puddings, custard (crème anglaise) is equally compelling—warm-on-warm comfort, less contrast, more continuity.
Plating can be clean and modern without turning fussy. A shallow bowl is better than a plate because it contains the sauce and lets it read as a deliberate component. Matte ceramics in cream, blush, or speckled stoneware give the pudding a quiet backdrop; a deep navy bowl makes the sauce look darker and more dramatic. A single scoop of ice cream, slightly off-center, looks more editorial than a centered “perfect” scoop.
For a dinner party, the move is to bake it in one dish and serve family-style. That first scoop is theater. If Mina wants individual portions, ramekins can work, but the timing tightens and the sauce can reduce faster—so it’s less forgiving. In a single dish, the edges set a bit more while the center stays lush, giving guests options without needing multiple bakes.
Pairings beyond ice cream and custard should support chocolate, not compete with it. Fresh berries—especially strawberries—bring acidity that cuts richness. A spoonful of softly whipped cream adds airiness without changing the flavor line. A pinch of flaky salt on the serving scoop can sharpen the sauce and make it taste more “chocolatey” without adding more cocoa.
Serving ideas that feel intentional (not like a sugar emergency)
These are the combinations that consistently make the dessert feel complete, whether it’s a Tuesday night or a birthday dinner. Each one is based on contrast—temperature, texture, or acidity.
- 🍦 Vanilla ice cream + warm pudding for the essential hot/cold drama
- 🥛 Warm custard + extra sauce for a British-pudding mood
- 🍓 Strawberries + whipped cream for brightness and balance
- 🧂 Flaky salt finish to sharpen cocoa and deepen the sauce
- ☕ Mocha-adjacent pairing: serve with coffee or espresso for a grown-up edge
One last design note: wipe the rim of the bowl before serving. It’s a small gesture, but it changes the whole visual read. The key insight: this dessert is already dramatic; plating should be calm so the sauce can be the headline.
After serving comes reality: leftovers, customization, and the small fixes that keep the sauce from disappearing.
Chocolate Self-Saucing Pudding Troubleshooting and Variations: More Sauce, Mocha, Mint, and Storage
A dessert this simple invites tinkering, but the structure is delicate enough that it rewards thoughtful changes. The two most common disappointments are predictable: the sauce is too thin, or the sauce seems to vanish. Both issues usually trace back to bake time and water volume.
If the sauce feels scant, the easiest adjustment is adding a small amount of extra boiling water—about 1/4 cup—to the topping liquid. This increases volume without forcing more sugar into the system. The pudding still sets, but there’s a deeper pool underneath. On the other hand, if the sauce is too thin, the pudding may simply need a slightly longer rest after baking so the liquid thickens as it cools and the starches finish setting.
If the sauce “vanishes,” the pudding is often overbaked. The top can look perfect even when the sauce has tightened into a sticky layer at the bottom. Next time, check earlier—start testing around the 22-minute mark, especially in smaller dishes or convection ovens. Remember: the top should be set and springy, not dry and firm like a sheet cake.
Flavor variations that keep the self-saucing structure intact
Some add-ins are friendly; others break the layering. The safest variations enhance the batter without changing its hydration too much. A favorite is mocha: dissolve instant espresso powder into the wet ingredients. Coffee amplifies cocoa and adds bitterness that reads “adult” without reducing comfort.
Nuts are also reliable if chopped and used with restraint. Walnuts or pecans add crunch and keep the spoonful interesting, especially if the pudding is served family-style and the texture can otherwise feel uniform from bite to bite. Mint is another option, but peppermint extract is powerful—measured in drops, not splashes—so it doesn’t turn medicinal.
Here’s a variation set that Mina uses depending on the mood:
- ☕ Mocha twist: add ~2 tablespoons instant espresso powder to the batter
- 🌰 Nutty crunch: fold in 1/2 cup chopped pecans or walnuts
- 🌿 Mint finish: add 1 teaspoon peppermint extract (or less for subtlety)
Storage and reheating without ruining the sauce
This pudding is best the day it’s baked, but leftovers can be genuinely good. Cover the dish and refrigerate for 2–4 days, depending on the specific recipe and how cleanly it was served. The sponge will firm in the fridge, and the sauce will thicken, which is normal.
Reheating is where restraint matters again. Microwave individual portions in short bursts—around 20–40 seconds—until the sauce loosens. Overheating can make the sponge tough at the edges. An oven reheat (low temperature, covered) works well for larger portions and preserves a more even texture.
Freezing is usually a miss because the sauce and sponge don’t thaw back into the same layered personality; the texture can turn grainy. When the whole appeal is a glossy underlayer, it makes sense to treat this as a fresh-or-leftovers dessert rather than a freezer project.
To keep the “magic” consistent, it helps to treat each variable like a design constraint. The final insight: more sauce comes from water, not extra mixing; better sauce comes from pulling the bake at the right moment.

Hi, I’m Landon Brooks. I am the editor-in-chief of Cook and Design, but for the first decade of my working life I was actually a product designer in New York.