Strawberry Cheesecake Recipe for a Perfect Slice: Choosing Ingredients That Guarantee Creamy, Classic Flavor
A truly memorable strawberry cheesecake starts long before the oven is turned on, because ingredient choices determine texture, aroma, and that “bakery-style” slice people talk about later. A creative kitchen rule of thumb: if a cheesecake tastes “flat,” it rarely needs more sugar—it needs better dairy, brighter vanilla, and strawberries treated with respect. The goal is a filling that reads as vanilla-forward, gently tangy, and lush, with strawberries adding contrast instead of stealing the spotlight.
Full-fat block cream cheese is non-negotiable for the signature body and clean bite. Tub-style spreads often contain stabilizers and extra moisture that can dull structure, which becomes obvious when slicing: the cut looks ragged, the edges slump, and the fork doesn’t glide. With blocks, the crumb presses neatly into the cut line, creating that perfect wedge silhouette. Bringing it to room temperature is equally important—cold cream cheese forces overmixing, which whips in air and can lead to puffing and sinking later. That “waistline” around the middle? It’s often an aeration issue, not bad luck.
eggs matter more than most bakers expect. Large eggs at room temperature emulsify smoothly, helping the filling set without turning rubbery. Add them gradually and mix only until incorporated, because eggs are the moment where overmixing becomes visually expensive: excess air expands in the oven and collapses during cooling, increasing the odds of cracks and an uneven top. A cheesecake can still taste fantastic with a crack, but a perfect slice is a visual promise as much as a flavor one. 🧁
Sour cream brings the gentle tang that people associate with classic New York-style sensibility, while keeping the interior plush rather than dense. A creative option that stays reliable: Greek yogurt as a swap when sour cream isn’t available, especially if the aim is a slightly brighter, lighter finish. The key is choosing a full-fat version to avoid graininess. Vanilla extract should be real, not imitation, because strawberry topping magnifies vanilla—when vanilla is thin, the topping makes it feel thinner. When vanilla is fragrant, strawberries feel more vibrant by comparison.
Strawberries deserve a quick strategy. Fresh berries bring perfume and color; frozen berries (used straight from the freezer) often provide consistent sweetness and a jammy texture once simmered. Avoid thawing frozen berries first, because thawing releases excess water that can dilute the topping and require longer cooking, which can mute flavor. A small boost—lemon zest and a splash of lemon juice—doesn’t make the topping taste like citrus; it sharpens strawberry identity the way salt sharpens caramel. 🍓
Even the crust has ingredient nuance. Graham cracker crumbs create the nostalgic, caramelized backbone that most people expect. Salted butter adds instant depth, though unsalted works if salt is adjusted elsewhere. If crumbs are made from whole crackers, a touch more butter may be needed because freshly crushed crumbs can be drier than packaged ones. The payoff is a base that stays crisp, buttery, and sliceable instead of sandy or soggy.
To keep planning practical, the following table compares core ingredients and what each one contributes. It helps troubleshoot flavor and texture before anything is baked—because fixing cheesecake after baking is like tailoring a suit after it’s sewn. ✂️
| Ingredient 🧾 | Best Choice ✅ | What It Controls 🎯 | Common Pitfall ⚠️ |
|---|---|---|---|
| Cream cheese 🧀 | Full-fat blocks | Body, smoothness, clean slice | Using spreadable tubs → looser set |
| Eggs 🥚 | Large, room temp | Set, structure, creamy bite | Overmixing after eggs → puff & sink |
| Sour cream 🥄 | Full-fat | Tang, silkiness | Low-fat → grainy texture |
| Vanilla 🌿 | Real extract | Aroma, classic flavor | Imitation → hollow finish |
| Strawberries 🍓 | Fresh or frozen (not thawed) | Brightness, topping texture | Watery topping from thawed frozen berries |
With ingredients dialed in, the next step is building a crust and filling that behave predictably—because the best strawberry cheesecake recipe isn’t just delicious, it’s repeatable under real-life kitchen conditions. That consistency is where the “perfect slice” is born. 🔥
Perfect Slice Strawberry Cheesecake: Crust Engineering for a Crisp, Buttery Base That Never Turns Soggy
A cheesecake crust is more than a supporting actor—it’s the textural counterpoint that makes the creamy filling feel even more luxurious. For a perfect slice, the crust must cut cleanly, hold its shape on the fork, and stay crisp for days in the refrigerator. That’s why the crust should be treated like a small baking project of its own, not a quick mix-and-press task.
The classic formula—graham cracker crumbs, sugar, melted butter—works because it creates a sandy dough that bakes into a cohesive sheet. Sugar isn’t only for sweetness; it helps the crust set and brown. Butter binds, but the amount needs to match crumb dryness. When crumbs come from a food processor, they’re often fluffier and drier than store-bought crumbs, so a small extra splash of butter can make the difference between a crust that slices like shortbread and one that crumbles like beach sand. 🍪
Pressing technique is where crust confidence is built. Press the mixture firmly into a greased 9-inch springform pan, compacting it along the bottom and nudging it slightly up the sides. A flat-bottomed measuring cup helps create even compression, especially near the edges where slices tend to fracture. Uneven thickness leads to uneven browning; uneven browning leads to bitter spots, which can clash with strawberry topping. A baker’s eye is useful here—think of building a tidy foundation that frames the filling.
Pre-baking is the crispness insurance policy. An 8–10 minute bake at a moderate-high heat sets the butter-sugar matrix and evaporates some moisture. Skipping this step often results in a crust that absorbs filling moisture and turns soft after chilling. For that reason, a quick pre-bake is worth the time even in “easy” recipes. The crust should cool briefly while the filling is mixed; it doesn’t need to be stone cold, but it should no longer look wet or glossy with butter.
For cooks outside the U.S. or anyone without graham crackers, digestive biscuits are a natural stand-in: similar sweetness, similar crumb behavior, and a warm wheat flavor that pairs beautifully with strawberries. A creative alternative for a more grown-up profile is mixing a portion of crushed almond cookies into the crumbs—just enough to add a whisper of nuttiness without overpowering vanilla. The crust can also be adapted for dietary needs: gluten-free graham crackers are widely available and behave nearly the same when processed into fine crumbs.
Crust issues are usually easy to diagnose. If slices collapse at the base, the crust was under-baked or under-pressed. If it tastes greasy, butter was too high or the crumbs were too fine. If it tastes bland, a pinch of salt can add dimension, especially when using unsalted butter. The aim is a crust that tastes like toasted honeyed wheat with a gentle salty edge—something that makes the filling taste sweeter without adding extra sugar.
To make the process practical, here is a concise, kitchen-friendly sequence that keeps the crust consistent batch after batch. The list is intentionally specific, because “winging it” is how great crusts become unpredictable ones. 🧈
- 🍯 Use fine, even crumbs (pulse, don’t pulverize into dust).
- 🧈 Mix with melted butter until the texture resembles wet sand that clumps when squeezed.
- 🥣 Press firmly into the pan bottom; then reinforce the edges where slices lift first.
- 🔥 Pre-bake until lightly fragrant and slightly deeper in color, then cool.
- 🧊 Keep the crust away from steam or splashes to preserve crispness (especially if using a water bath setup).
Once the crust behaves like a crisp cookie layer, attention can shift to the filling—the portion where mixing style, temperature management, and bake cues determine whether the cheesecake becomes satiny and tall or merely “fine.” The difference is often just a few disciplined minutes. ⏱️
With the foundation set, it’s time to craft the signature vanilla filling: smooth, rich, and stable enough to support a glossy strawberry topping without slumping at the edges.
Classic & Creamy Strawberry Cheesecake Filling: Mixing Method for Ultra-Smooth Texture Without Cracks
The filling is where strawberry cheesecake earns its reputation. People remember the way the fork slides through the center—no curds, no grit, no air pockets—just a cohesive, silky custard with a gentle tang. Achieving that texture is less about fancy tools and more about temperature discipline and mixing restraint. In a busy kitchen, these two ideas are what separate a showstopper from a “tastes good but looks homemade” outcome. ✨
Start with room temperature cream cheese, sour cream, and eggs. This is not a fussy chef’s superstition; it’s physics. Warmed dairy blends smoothly, preventing lumps that require aggressive mixing. Aggressive mixing traps air. Trapped air expands in the oven, then collapses during cooling, which can cause cracks or that slightly sunken center that makes slices look uneven. A good habit is to set ingredients out 30 minutes to 2 hours depending on room temperature—cooler homes need more time.
Mixing should follow a calm progression. Cream cheese is beaten first until creamy, about 1–2 minutes, just to smooth it. Sugar goes in next and is mixed only until incorporated; long mixing can make the batter looser and foamy. Eggs are then added one at a time and mixed on medium-low, stopping as soon as the batter becomes uniform. This is the critical moment: do not overmix after eggs. Cornstarch is a small but helpful stabilizer; it encourages a clean set and can reduce weeping, especially when slices sit on plates at a party. Vanilla extract and sour cream finish the batter, and any final mixing should be brief.
Even with perfect technique, a few tiny specks can remain. Tiny lumps are acceptable; they often bake out. Large lumps are not—they create pale pockets and disrupt the custard. A silicone spatula is the best tool for preventing them because it can scrape the bowl thoroughly, ensuring the cream cheese at the bottom isn’t left unmixed. A creative kitchen trick: once the batter is in the pan, tap the filled pan gently on the counter to coax hidden air bubbles up before baking. 🥄
Crack prevention is as much about the cool-down as the bake. Cheesecake dislikes sudden temperature changes. After baking, the best practice is to turn the oven off, crack the door, and let the cake rest inside for about an hour. That slow descent in heat reduces the stress that causes surface splitting. Next, cool the cheesecake at room temperature on a wire rack, then cover and chill for at least 6 hours (overnight is even better). The chill time isn’t a suggestion; it’s when the custard firms fully, allowing slices to stand tall and clean.
There are two reliable approaches to moisture management. Traditional water baths provide gentle heat and humidity, but they can intimidate bakers because of leak risk. A practical compromise is creating steam by placing hot water in a roasting pan on a lower rack, or placing the springform inside a slightly larger cake pan as a buffer if setting it into a roasting pan. This reduces soggy crust accidents while still softening the bake environment. The key is ensuring the springform’s base is well protected if any direct water contact is used.
Doneness cues are more trustworthy than strict minutes because ovens vary. A simple test: the edges should look set, while the center should still have a slight wobble. Insert a knife near the edge; it should come out clean there, while the center may leave a bit of thick batter. An oven thermometer is a quiet hero here—many ovens run hot or cold, and cheesecake is sensitive to even small shifts. In 2026, countertop ovens and smart ranges are common, but calibration still varies; an inexpensive thermometer remains a better guide than a digital display. 🌡️
When the filling is baked and chilled correctly, the result is a slice that feels both light and rich—an almost paradoxical texture that makes strawberry topping taste brighter. Next comes the final layer: a strawberry sauce that looks glossy, tastes fresh, and sets into a spoonable compote rather than a runny syrup. 🍓
A finished filling deserves a topping that complements rather than competes, and the difference is in how strawberries are cooked—briefly, thoughtfully, and with a touch of lemon for lift.
Homemade Strawberry Sauce Topping for Strawberry Cheesecake: Glossy Compote in 10 Minutes
Strawberry topping is the layer that makes the dessert feel celebratory, even when served on an ordinary weeknight plate. The best topping tastes like concentrated berry—bright, slightly tangy, and fragrant—without becoming candy-sweet or watery. A smart approach is a quick compote thickened lightly with cornstarch, which creates a glossy, spoon-coating sauce that stays where it’s placed on the cheesecake. 🍓
Start by deciding the texture goal. For a classic look, quarter or slice strawberries so pieces remain visible. A mix of fruit sizes is visually appealing: smaller pieces melt into the sauce, while larger ones provide soft bites. Fresh strawberries deliver aroma; frozen berries provide consistency, especially outside peak season. If frozen is used, cook them straight from frozen to keep control of liquid release. Thawing first dumps extra water into the pot and can push the sauce toward a thin, diluted finish.
The thickener should be treated carefully. Cornstarch needs to be dissolved in a small amount of water first to prevent clumps. Once the slurry is smooth, it can be added to the pot along with strawberries, sugar, vanilla, and optional lemon zest and juice. The mixture is brought to a simmer and stirred frequently for several minutes. During that short cook, the strawberries soften, juices concentrate, and the sauce begins to shine. Overcooking can dull the fresh berry note, so the sweet spot is a quick simmer until the sauce thickens enough to cling to a spoon.
Lemon zest is optional, but it’s one of the easiest upgrades for a topping that tastes “restaurant-level.” Zest contributes aromatic oils that lemon juice alone can’t provide. A small splash of lemon juice adds a gentle bite that balances cream cheese richness. The result is not lemony; it’s simply more strawberry-forward. Vanilla in the sauce is another subtle enhancer that ties the topping to the filling, making the dessert feel like a cohesive composition rather than stacked parts.
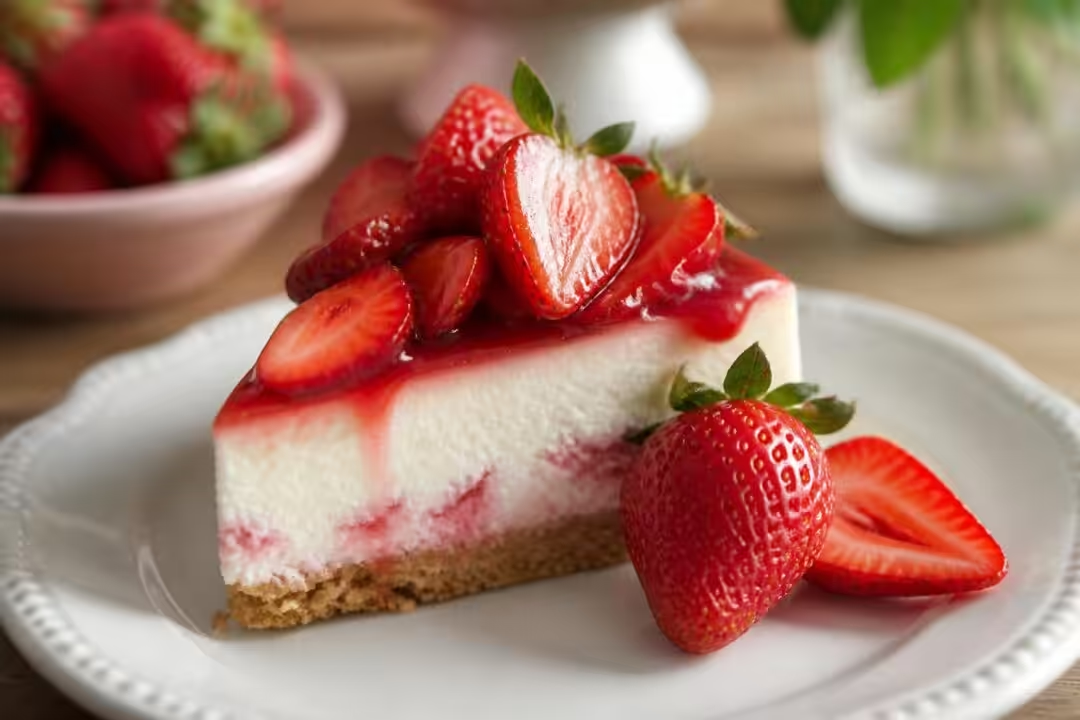
Cooling matters more than it seems. Warm sauce poured over a cold cheesecake can create condensation, which may loosen the topping and make slices look messy on the plate. Cool the compote in the refrigerator until it thickens fully; it will continue to set as it chills. Then spoon it over the cheesecake shortly before serving for the glossiest finish. For a more dramatic look, let some sauce cascade toward the edge while keeping a thicker mound in the center, then add a few fresh strawberry halves as garnish.
Serving strategy can turn one cheesecake into a party-friendly dessert. Because cheesecake is rich, it can comfortably yield 12 to 16 slices, depending on how generous the occasion is. For clean slices, use a long knife dipped in hot water and wiped dry between cuts. This small step keeps the strawberry layer from dragging and prevents the filling from smearing. If a dinner includes multiple desserts, narrower slices feel thoughtful and still satisfying. 🍽️
Storage should protect both texture and aroma. Covered tightly, cheesecake keeps in the refrigerator for about 3 to 4 days. If longer storage is needed, freezing works best without topping. Remove the outer ring of the springform pan, keep the base under the cake for support, wrap in two layers of plastic wrap plus a layer of foil, and freeze for 1 to 2 months. Thaw overnight in the fridge, then top with freshly chilled compote for the best appearance.
For cooks who like to adapt, strawberry topping can be swapped with other fruits while keeping the same method: blueberries, raspberries, or even mango can work with adjusted sugar and lemon. Yet strawberry remains the most nostalgic pairing—bright red against ivory filling, a color contrast that feels timeless in photos and on the table. The final insight is simple: when the topping is thick, glossy, and properly cooled, it turns a good cheesecake into a perfect slice worth remembering. 🌟

Hi, I’m Landon Brooks. I am the editor-in-chief of Cook and Design, but for the first decade of my working life I was actually a product designer in New York.