Sticky Date Pudding Origins and Why This “Sticky Toffee” Classic Still Wins
Sticky Date Pudding—often called Sticky Toffee Pudding outside Australia and New Zealand—sits in that rare category of desserts that feels both nostalgic and impressively restaurant-worthy. The name debate is more than a regional quirk; it points straight to the ingredient that gives the pudding its unmistakable personality: dates. When dates are softened and mashed into the batter, they deliver a deep caramel color, a toffee-like sweetness, and a plush texture that can’t be replicated by plain sugar alone.
In many households, the earliest memory of this dessert is tied to convenience versions—frozen puddings brought out only for special occasions. That “special occasion” aura matters: it explains why people expect the dessert to be very saucy and served warm, like a treat that bends the rules of everyday restraint. One common complaint about store-bought versions has always been the same: not enough sauce to go around. That’s not a small issue—because the sauce is not just decoration, it’s a structural element of the experience. 🍯
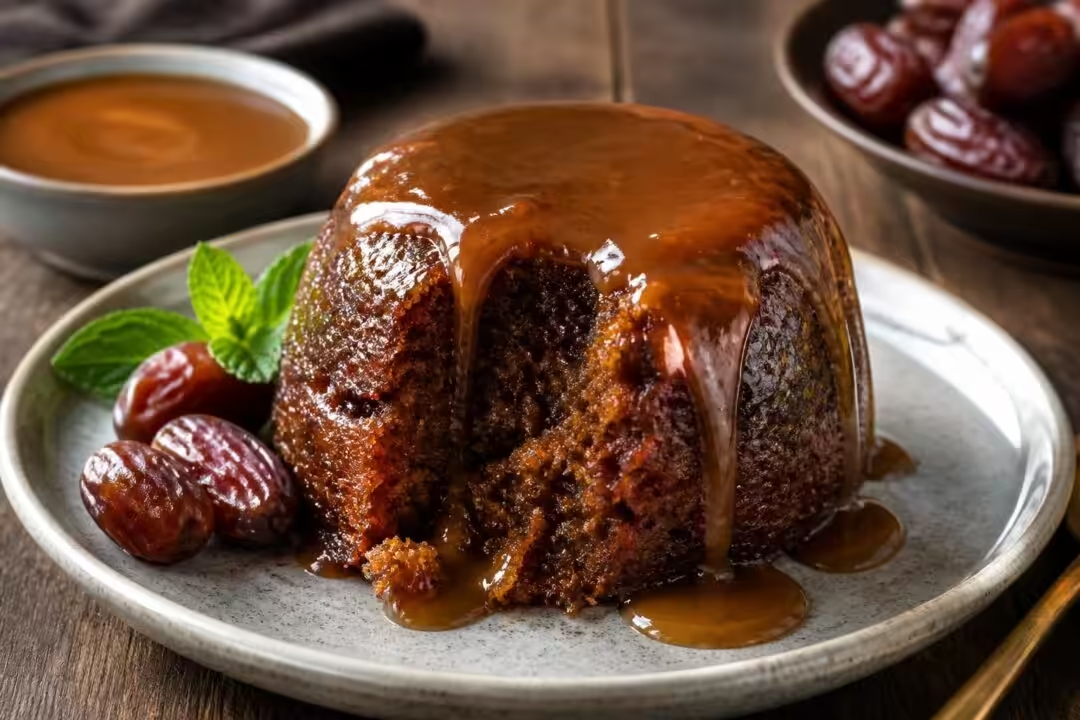
To keep the story grounded, imagine a cozy winter service at a small bistro where the dessert menu has only three items. One is a sticky date pudding served in individual molds. Regulars order it because they know what they’ll get: a warm sponge with a dark, almost mahogany crumb, drenched in butterscotch, paired with cold vanilla ice cream. That hot-cold contrast is the “theatre” of the dish, and it’s why this pudding keeps selling even when trends shift to lighter sweets.
Part of the appeal comes from how the dessert bridges cultures. The British identity of sticky toffee pudding is well known, but the Australian and New Zealand habit of calling it sticky date pudding highlights the ingredient list more honestly. In practical terms, a baker benefits from thinking “date pudding” first, because it keeps technique front-and-center: the date mixture is not optional, and it needs to be handled correctly for the signature texture to appear.
Another reason it endures in 2026 is that it suits modern cooking rhythms. Home cooks want desserts that can be made ahead, reheated without turning dry, and served in flexible formats. Sticky date pudding checks every box when made correctly: the crumb stays tender for days, and reheating—especially in the microwave—returns it to that just-baked softness. The final insight is simple: this dessert isn’t famous because it’s complicated; it’s famous because it’s engineered for comfort.
Ultimate Sticky Toffee Pudding Ingredients: Dates, Baking Soda, and the Science of Moisture
The backbone of an ultimate sticky toffee recipe is not just sweetness—it’s controlled moisture. The most important move is turning chopped pitted dates into a soft mash by combining them with boiling water and baking soda. This step can look unappealing in the bowl, yet it’s the quiet engine of the entire dessert. The soda helps break down the fruit and encourages a tender crumb, while the hot soak draws out the dates’ natural sugars and dark color.
It’s worth treating the date mixture like a “wet ingredient” that must be consistent. If it’s mashed too roughly, the cake risks baking up pale with scattered bits rather than becoming evenly burnished. If it’s too watery, the sponge can turn gummy. The ideal texture resembles a thick porridge—soft, cohesive, and spoonable. That consistency blends smoothly into the batter so every bite tastes like caramelized warmth rather than “chunks of fruit.” ✨
From there, the batter relies on everyday pantry staples: butter, brown sugar, eggs, flour, and baking powder. Brown sugar brings molasses notes that echo toffee. Butter carries flavor and gives the crumb a fine, velvety finish. Eggs provide structure, but the batter should never be overworked after the flour goes in; excessive mixing can toughen the sponge and steal the signature tenderness.
For those cooking for date skeptics, the key reassurance is practical: dates rarely taste like “dates” once baked into this formula. Their role is more architectural than fruity—adding stickiness, depth, and moisture. If a substitution is truly needed, prunes can step in because they behave similarly when cooked down, though the prep changes: they benefit from simmering in water first to soften thoroughly before mashing. The point isn’t to make a “prune pudding,” but to preserve the same silky texture and dark hue.
Ingredient temperature matters more than many expect. Room-temperature eggs blend more cleanly into creamed butter and sugar, reducing the risk of a curdled-looking batter. Softened butter (not melted) also helps trap a bit of air during mixing, which keeps the sponge light enough to soak up sauce without collapsing.
Below is a practical ingredient checklist that keeps the recipe organized and prevents last-minute scrambling:
- 📌 Pitted dates (chopped): the foundation of stickiness and color
- 🔥 Boiling water + 🧪 baking soda: creates the mash that transforms texture
- 🧈 Unsalted butter: richer flavor control and consistent baking
- 🍂 Brown sugar: molasses depth for both sponge and sauce
- 🥚 Eggs at room temperature: smoother emulsion and better rise
- 🌾 All-purpose flour + baking powder: structure with tenderness
- 🥛 Heavy cream + vanilla: the silkiness behind butterscotch sauce
With the ingredient logic in place, the next step is where the “ultimate” label is earned: the technique of baking, piercing, and soaking that makes the pudding feel impossibly moist.
Step-by-Step Sticky Date Pudding Method: One Pan Cake or Individual Molds
A reliable sticky date pudding method begins with choosing the serving format. Both styles—one large cake for slicing or individual puddings—are valid, and the choice depends on the moment. A single pan feels communal and nostalgic, like a dessert brought to the center of the table. Individual molds feel elegant and controlled, with sauce pooling around each portion like a plated restaurant dessert. 🍮
The batter process is intentionally straightforward. First, the dates are soaked with baking soda and boiling water, then mashed thoroughly. Separately, butter and brown sugar are mixed until smooth, then eggs are incorporated. Flour goes in next, and baking powder is sprinkled across the surface before mixing just until combined. Finally, the date mash is folded in quickly to avoid over-developing gluten.
Timing varies by vessel. A square pan around 20 cm (8 inches) typically bakes in the mid-30-minute range at 180°C/350°F (or slightly lower for fan ovens). Individual molds often bake closer to the mid-20-minute range, depending on size. A simple skewer test remains the clearest cue: the center should come out clean, but the crumb should still feel plush—this is not a dry sponge cake.
For cooks who prefer a system, here is a timing guide that keeps decisions simple and consistent:
| Format 🍽️ | Typical Fill Level 🧁 | Approx. Bake Time ⏱️ | Soak-in Sauce Amount 🍯 | Best Use ⭐ |
|---|---|---|---|---|
| One large pudding (square pan) | Full pan (smoothed top) | ~35 minutes | ~1/2 cup over the top | Family-style slicing and sharing |
| Individual molds | 2/3 full (room to rise) | ~25 minutes | ~1 tbsp each | Plated servings for guests |
| Muffin tin version | 2/3 full | ~20–25 minutes | Drizzle gradually (let it absorb) | Parties and buffet desserts |
The most important detail is what happens immediately after baking, while the crumb is still hot and receptive. The surface should be pierced repeatedly with a skewer. For a large cake, dozens of holes across the top are ideal; for smaller portions, a cluster in the center works well. The goal is not to shred the sponge, but to create channels for sauce to travel downward.
Once pierced, warm butterscotch sauce is poured or spooned over the pudding and left for about 10 minutes to soak. This wait is not a nuisance—it’s a transformation. The sponge darkens, the edges become glossy, and the interior turns almost custardy in feel while still holding together. The insight to carry forward is clear: baking creates the structure, but soaking creates the signature.
Sticky Toffee Butterscotch Sauce: Rich, Silky, and Never Grainy
A proper sticky toffee butterscotch sauce should taste like melted caramel candy and feel like velvet on the tongue. The standard approach uses brown sugar, butter, heavy cream, and vanilla, simmered briefly until glossy. The technique sounds simple, but the difference between “fine” sauce and “can’t-stop-eating-it” sauce is in heat control and texture awareness.
The pan should sit over medium heat so the sugar dissolves gradually as the butter melts. Once the mixture reaches a simmer, it needs only a short cook—around a couple of minutes—so it thickens without becoming bitter or overly reduced. Stirring occasionally keeps the bottom from scorching. When the sauce is ready, it coats the back of a spoon and leaves a clear path when a finger is drawn through it.
Graininess is the most common pitfall. It usually happens when sugar crystals cling to the side of the saucepan or when the sauce is heated too aggressively. A practical trick is to keep the sides of the pan clean by gentle stirring and avoiding splashes up the walls. Another safeguard is using a heavy-bottomed saucepan, which distributes heat more evenly.
Flavor customization can be subtle but impactful. Vanilla is classic, yet a small pinch of salt can sharpen the caramel notes and prevent the sauce from tasting one-dimensional. For a more grown-up version, a tiny splash of espresso or a hint of warm spice can deepen the toffee character without turning the dessert into something else. The goal is always the same: support the date sponge, not compete with it. ☕
Because the dessert is unapologetically sweet, a lighter sauce variation can be useful for guests who prefer restraint. Reducing sugar, butter, and cream by about half creates a gentler base, and a small amount of milk thickened with cornstarch can restore body without returning all the richness. This approach keeps the pourable quality while cutting intensity—handy for larger gatherings where multiple desserts are served.
The sauce also performs a practical role in storage. When some is poured into the hot cake, it helps lock moisture in, which is why sticky date pudding reheats so well. The remaining sauce should be kept separately and warmed just before serving, so it stays glossy rather than congealed.
Presentation matters, too. A confident plate uses sauce in two passes: first the soak, then a final pour at the table. That second pour is the moment people remember. The key takeaway is deliciously direct: the sauce is not optional—it’s the engine of the “sticky” promise. 🍯
Serving, Make-Ahead, and Reheating Tips for Moist Sticky Date Pudding Every Time
Sticky date pudding is at its best when served warm with something cold and creamy. The classic pairing is vanilla ice cream, which melts into the sauce and creates a self-made custard right on the plate. For a more traditional feel, thick cream or warm custard also works beautifully, especially when the goal is a softer, more enveloping finish.
To make serving feel effortless, the dessert can be treated like a planned performance. The pudding can be baked earlier in the day, pierced, and soaked with sauce. Then, just before guests arrive, both pudding and remaining sauce are reheated. The microwave is surprisingly effective here because it warms the sponge quickly while preserving moisture. Oven reheating can work too, but it risks drying the edges unless covered or paired with extra sauce.
For a dinner party scenario, individual puddings offer the smoothest plating. They can be baked in ramekins or even a muffin tin, soaked, and then turned out onto plates. When using muffin tins, sauce should be added gradually, letting it absorb before adding more, since the smaller cakes can saturate quickly. That patience is rewarded with a uniform, glossy crumb.
Storage is straightforward. Once cooled, the pudding keeps well refrigerated for several days because the sauce-soak step protects it. The sauce itself should be stored separately and reheated gently, adding a small splash of cream if it thickens too much. This is the kind of dessert that’s forgiving in real kitchens, which explains its enduring popularity across busy households and professional pastry sections.
Portioning also deserves strategy. Sticky date pudding is rich, and smaller portions often satisfy more than expected—especially when paired with ice cream and extra sauce. For larger appetites or celebratory tables, generous servings feel appropriate, but it helps to offer a choice: “extra sauce” or “light sauce.” That tiny bit of control makes more people happy, and it prevents the dessert from feeling overwhelming.
To keep the experience consistently excellent, these practical checks help:
- 🔪 Cut or unmold only after the 10-minute soak so the crumb sets with the sauce inside
- 🧊 Pair with ice cream for contrast, or 🥛 cream for a softer finish
- 🔥 Warm the sauce separately and pour just before serving for maximum gloss
- 📦 Refrigerate leftovers with confidence; reheat portions gently to keep them plush
- 🍯 When in doubt, make more sauce—running out is the only real disaster
A final plating trick brings it all together: spoon a small puddle of sauce onto the plate first, set the warm pudding on top, then add ice cream and finish with a thin ribbon of sauce. The last insight is the one that turns a good dessert into a legendary one: control temperature and sauce flow, and the pudding will feel freshly baked every time. ✨

Hi, I’m Landon Brooks. I am the editor-in-chief of Cook and Design, but for the first decade of my working life I was actually a product designer in New York.