
| Sections / What to remember 📝 | Key takeaways ✅ |
|---|---|
|
|
Why this matters this week: With summer’s heat arriving earlier in many urban microclimates, attention to harvest timing keeps texture and color vivid on the plate. Every choice in the garden—variety, planting rhythm, how the pod is removed—has a visible effect in the kitchen. The following sections move from practical field cues to preserving strategy and visual-minded cooking suggestions for the season.
When to Harvest Green Beans: Signs for Snap and Dry Varieties
Timing is where flavor and texture are decided. For fresh snap or wax beans, the ready window typically falls between 45 and 65 days after sowing. Those pods should be slender, nearly pencil-thick, and break with a clean, audible snap. The inside seeds may show faint outlines, but they must remain pliable and green rather than bulging and hard.
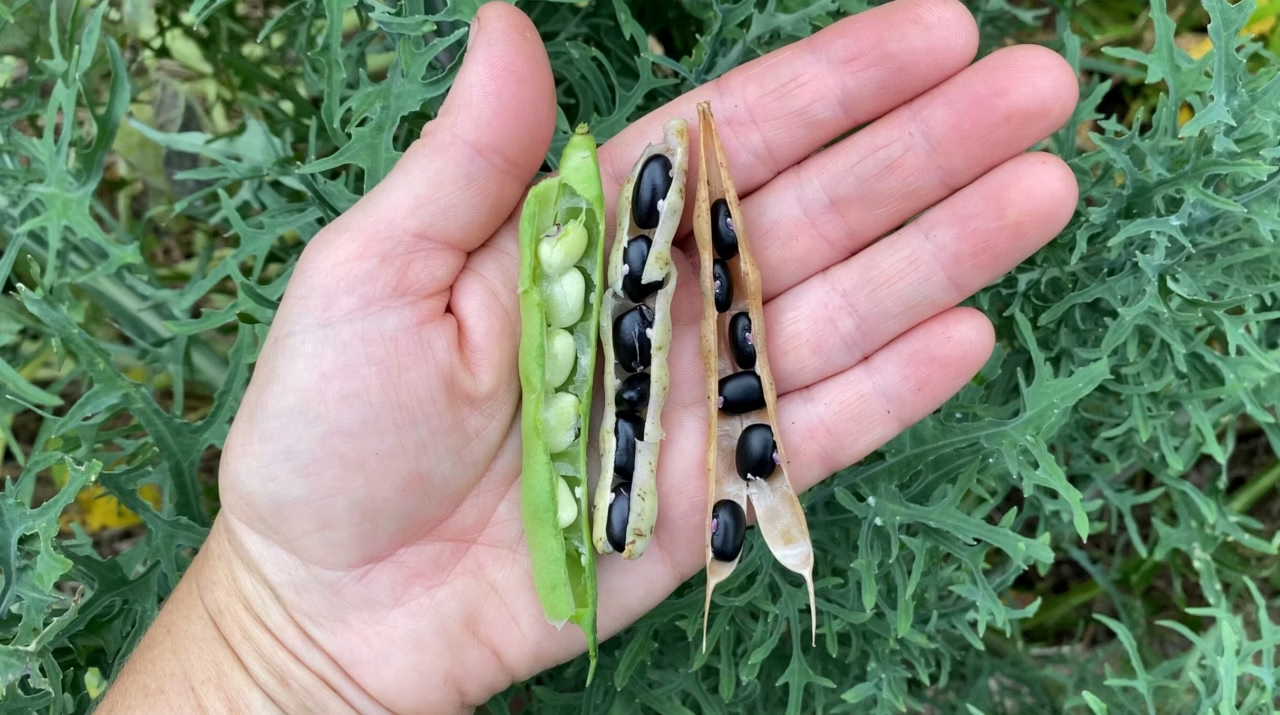
Dry or shelling varieties follow a different calendar; many demand 60–90 days and careful observation of pod color and rigidity. Pods destined to be stored will turn straw-colored, brown, or deep wine-purple depending on cultivar. The most reliable check is the rattle test: a dry pod that rattles when shaken signals fully mature, desiccated seeds inside.
These two sensory rules—snap for fresh eating, rattle for storage—are both economical and dependable. They translate immediately into cooking outcomes. Snap beans harvested early will steam crisp, retain verdant color, and plate beautifully. Over-mature pods become fibrous and opaque; they will need long cooking to become palatable and will not hold a lacquered glaze on the pan.
Varietal behavior also matters. Bush cultivars tend to fruit in a more compact window, producing a flush of pods that mature close together. Pole beans offer a longer production arc because vines continue flowering and setting fruit as they grow. Understanding whether a seed packet contains a bush or pole variety helps avoid the disappointment of a glut one week and nothing the next.
To anchor these cues in a real-world frame, imagine a small urban grower named Mina who plants a trio of bush beans in a raised bed. Mina checks pods daily; the first successful picks are always the ones that break crisply. When pods begin to bulge, the harvest strategy changes—those pods are either removed promptly to stimulate a second flush or left intact to finish as dry beans for winter soups. The sensory habits developed across a single season become the gardener’s calendar: snap, pick, and repeat for fresh plates; rattle, harvest, and cure for long-term stores.
Key insight: Master the two simple tests—snap for fresh beans, rattle for dry seeds—and timing becomes far less mysterious.
Green Beans Days to Harvest: Variety-Specific Timelines and Plant Habits
Knowing the specific days-to-harvest on a seed packet is useful, but it should be interpreted alongside habit and climate. The same cultivar planted in an urban microclimate with reflected heat can reach readiness a week earlier than the book estimate. The typical ranges—45–65 days for snap beans and 60–90 days for dry beans—are starting points rather than rigid rules.
Varieties also come with distinct culinary identities. Snap and wax types such as ‘Provider’ or ‘Kentucky Wonder’ are bred for tenderness and frequent picking. Dry types like cannellini, pinto, or cowpeas (for example Pinkeye Purple Hull) are bred to form dense, durable seeds that store well.
Any cultivar may be bush or pole. Bush beans yield in concentrated waves; pole beans extend production across months. The choice between the two often comes down to space and lifestyle. A compact raised bed will favor bush types; a narrow balcony with a vertical trellis suits pole beans and sometimes yields more overall by stacking production vertically.
Succession planting is the practical response to single-wave harvests. For fresh beans, sow every two to three weeks through the frost-free season to keep the kitchen supplied. For dry beans intended for fall storage, plan the last planting no less than three months before expected first frost; otherwise seeds may not fully desiccate in the field.
Here is a concise comparative table that helps visualize variety timing, use, and habit:
| Variety 🍀 | Days to Harvest ⏳ | Habit 🌿 | Best Use 🍽️ |
|---|---|---|---|
| Provider 🟢 | 50–60 days | Bush | Fresh snapping, freezing |
| Kentucky Wonder 🌱 | 55–65 days | Pole | Steaming, glazing |
| Pinto / Cannellini 🟤 | 70–90 days | Bush or Pole | Dry storage, soups |
| Pinkeye Purple Hull 🟣 | 75–90 days | Bush | Dry beans, heirloom seed-saving |
Practical example: a gardener in an early-warming zone plants a mix of Provider (bush) for immediate use and Kentucky Wonder (pole) for steady supply. The bush bed produces quickly and is followed with a second sowing; the poles keep feeding through late summer. Both decisions reflect an aesthetic and a utilitarian strategy: harvest cadence is designed to match weeknight menus and seasonal preserving plans.
Key insight: Use packet days as a baseline and adapt with succession planting and habit-aware choices to fit kitchen needs and local climate rhythms.
How to Harvest Green Beans: Techniques for Crisp Snap Beans and Dry Seeds
A steady hand and a small set of habits will preserve both plant health and pod quality. For snap beans, grasp the bean near the stem and give a firm twist or snap so the pod separates cleanly. This preserves the small leafy cap at the stem end—the cap helps reduce moisture loss and keeps the pod looking fresh in storage.
When harvesting pole beans, support the vine with the free hand to avoid uprooting or tearing the plant. A single careless yank can strip blossoms and young pods, reducing overall yield. For bush beans, snipping with sharp pruners can speed harvest while minimizing plant disturbance.
For dry beans intended for storage, pods can be allowed to stay on the vine until they turn straw-colored and the seeds rattle inside. If autumn weather goes wet before the pods are fully dry, bring whole stems indoors to finish curing in a warm, ventilated spot or on racks with a gentle fan. Drying indoors prevents mold and preserves seed viability for both eating and sowing.
Tools make the chore faster and cleaner. A small harvest bag, a sharp pair of snips, and a shallow colander for field rinsing are enough for most gardeners. For larger batches destined for storage, harvest into burlap or paper sacks rather than plastic to allow evaporation during field curing.
Quick, practical list of harvesting tools and techniques:
- ✂️ Sharp pruners for clean snips and fast harvest
- 🧺 Harvest apron or tote to keep hands free and prevent crushing
- 🛏️ Pillowcase method for threshing dry pods: collect pods, shake or whack gently
- 🌬️ Fan-assisted drying indoors if early rain threatens field curing
- 🧊 Cool container to move fresh beans quickly to refrigeration
A short demonstrative video is helpful when first learning to harvest without damaging plants. Watching a steady hand remove pods and maintain vine structure clarifies where to hold and where to cut. The rhythm of harvest—daily or every other day for snap types—also conditions the plant to keep producing flowers and pods.
Key insight: Harvest with intent: preserve the stem cap on snap beans, support vines, and use simple tools for speed and plant health.
Storing and Processing Beans: Fridge, Freeze, and Drying for Long-Term Use
Handling immediately after harvest determines how long flavor and texture last. Fresh snap beans should be cool-chained: rinse only if necessary, pat dry, and store in the refrigerator in a perforated bag or container to maintain humidity without trapping moisture. Proper storage keeps beans crisp for several days; for best quality, use within three to five days.
Freezing is the most effective way to preserve summer beans for winter menus. Quick blanching—typically 2–3 minutes in boiling water for slender pods—followed by an ice bath and drying will lock in color and texture. Pack blanched beans in measured portions (1 cup or 250 g) for ease of use and store in airtight containers or vacuum-sealed bags.
For dry beans, thorough curing is essential. Mature pods should be brittle; seeds inside should be hard enough that fingernails cannot indent them. Once harvested, dry pods can be threshed by hand or by placing in a pillowcase and tapping gently. After shelling, store seeds in sealed glass jars in a cool, dark place, ideally below 60°F (15°C) and low humidity. Properly dried and sealed seeds remain viable both for planting and eating for multiple seasons.
Here is a small storage reference table for quick planning:
| Storage Method 🧾 | Typical Lifetime | Key tip 🔑 |
|---|---|---|
| Refrigeration 🧊 | 3–7 days | Perforated bag; keep cool immediately |
| Freezing ❄️ | 6–12 months | Blanch → ice bath → dry → pack |
| Room drying (seeds) 🌾 | 12+ months | Store in sealed jars, cool dark pantry |
When rainy fall weather threatens to ruin field curing, move pods indoors and create airflow. A small fan and elevated racks will finish the job in days rather than letting humidity and mold set in. For seed-savvy gardeners, label jars with variety and harvest year; photo documentation of seed stock aids design-minded pantry management through the seasons.
Key insight: Choose the preservation path that suits the intended end use—refrigerate for near-term cooking, freeze for winter vegetables, cure and jar for seed and dry-bean longevity.
Design-Forward Uses: Cooking, Preserving, and Seed-Saving for Seasonal Menus
The choice of harvest moment is a design decision as much as a culinary one. fresh snap beans harvested in their prime deliver clean lines and bright green color on the plate, perfect for the kind of restrained, seasonal plating favored by modern home cooks. Quick pan-searing with butter and a sprinkle of toasted sesame creates a simple, visually striking side.
Dry beans open an entirely different pantry language: long-simmered soups, textural stews, and baked winter casseroles that comfort through colder months. A jar of home-cured cannellini is as much a seasonal design element in a pantry as a jar of preserved citrus; labels, vintage glass, and careful stacking turn storage into curated material.
Practical recipe and use ideas with visual intent:
- 🍽️ Quick glazed beans: pan-sear snap beans, finish with soy, butter, and lemon zest for glossy color.
- 🥣 Heirloom bean stew: soak and slow-cook dry beans with aromatics and finish with microgreens for contrast.
- 🧊 Portioned frozen veg: blanch and pack into single-serving cubes for composed weeknight plates.
- 🌱 Seed-saving ritual: cure, sort, label, and dry-store heirloom seeds to preserve lineage and flavor.
Saving seeds deserves specific attention. Choose pods only from healthy, true-to-type plants. Let pods dry fully, then shell and store seeds in labeled, desiccant-lined packets. This small practice preserves cultivar history and gives the season-to-season continuity that design-focused cooks appreciate.
Finally, the visual aspect of serving green beans matters. Keep plates minimal. Use matte ceramics and a single bright accent—a curl of preserved lemon, toasted sesame, or a scatter of crushed peanuts. These little details honor the harvest timing choices made weeks earlier and complete the seasonal design loop from garden to table.
Key insight: Treat harvest timing as a compositional choice: the moment chosen in the garden determines texture, color, and the visual language of the plate.

Hi, I’m Landon Brooks. I am the editor-in-chief of Cook and Design, but for the first decade of my working life I was actually a product designer in New York.


5 Comments
Succession planting is urban planning for your garden; stagger the yield to match heat data.
The snap: nature’s own stroke weight.
Landon, the pod’s architecture—clean snap or rattle—defines the harvest blueprint.
Snap test is all you need, Landon. No fuss.
Harvest snap beans at 45–65 days: a clean break is your unit test for readiness.
Les commentaires sont fermes.